Wednesday, August 29, 2012

Victorian Crazy Quilt - True Love

 
As I got further into this project I started to create blocks with a theme. I was working on this on during the month of February, so I had the idea to do a block with the word “Love” in it.
 
 
By embroidering the word, “Love” and including a small heart it added more visual interest to the block, and made your eyes search for more.
 
 
Here you can see a good example of the over stitching of one colored embroidering thread over another. The mixing of these different colors helps in adding dimension to certain areas within the different blocks.
 
 
This is a good example of the different kinds of fabrics used within this project. I used velvets, cottons, satins and some pretty bridal fabrics.
 
 
Once I started to get comfortable using the beads, it was so much fun to see what I could create with them. Here I made the leaves for the flowered vine.
 
 
I really enjoyed the feather stitch. By adding rows and rows of feather stitching, I was able to fill in a large corner of this block and add additional texture.
 
 
More is always better on Victorian quilts and by adding the crystal clear beads along the length of the flowered vine, it made the actual block sparkle even more.

Tuesday, August 28, 2012

Wednesday’s Project

 
When our latest little granddaughter, “Wednesday” needed her new bedroom decorated, I decided to join in on the fun and make a little keepsake that she would have for many years to come.
 
 
I wanted to make this wall hanging very unique, just for Wednesday, so drew up this butterfly as the main focal point for the piece.
 
 
The nice part of using a butterfly was that I could make it any colors that I chose.
 
 
I drew the center of my artwork on a piece of mat board that was 6 x 8 inches. Once the initial coloring was finished on the butterfly, I drew in swirls with a clear gel pen and then sprayed green Glimmer Mist over the background. The gel pen acted as a resist and remained white. I liked this part, as it added more interest to the background.
 
 
The butterfly was too light, so I used the gel pens again to bring in more color. I also liked the way these pens leave a raised dimension on the top of the paper.
 
 
The next step was to create the background for the butterfly art. For this part I went to my husband’s mat board stash again, and found a perfectly colored green piece. Once this was cut down to the proper size, I used my stamps and added images and text with ink and paints. I had a set of calendar stamps, so I stamped Wednesday’s name into the background to make it personal. I also inked in brown to give it an aged look.
 
 
I wanted to incorporate some torn paper into the project. I enjoy doing this, as it is a great way to break up all the straight lines. I had some brown paper with a green core that went perfectly with the colors I was using. Since I was using this technique later in the artwork I wanted to add a little to the center.
 
 
To get everything glued into place I used my brayer and Mod Podge that I brushed on with a foam brush.
 
 
To give some contrast to the different layers I was applying, I chose to use a purple cardstock and glued it down next. It brought out the purple colors in the butterfly.
 
 
For the final assembling of the center piece, I placed my butterfly art over the purple paper and everything was glued down and pressed with a stack of books.


I have a feeling that Wednesday will be a free spirit she grows up. She is developing a personality all her own. I decided to use the phrase: “Butterflies Are Free” referring to my special little girl. I cut out some chipboard letters and taped them to a sheet of cardstock. With a stencil brush and ink pad I colored them orange.
 
 
Here the letters are in place and I also added paper flowers and in this step you can see the Mod Podge is wet.
 
 
The main materials for this project came from a recycled frame and already cut picture framing mat board. I painted the mat board in browns with acrylic paint.
 
 
 I used my stamps and did a little stamping with paint instead of ink. Then I inked over the stamped areas to tone down the white paint.
 
 
 Next I needed a base for everything to be placed on, and also a base for the next part to be created on. I drew on some positioning lines where I wanted to do a little torn paper design.
 
 
Here you can see the paper being glued down. I wanted a stained glass affect.
 
 
After everything was put in place on the base mat, and all the torn paper was glued into place, the matting itself was glued down.
 
 
Now to make sure everything stayed flat and in place while it dried, I covered it with wax paper and stacks of books and magazines.
 
 
Now out to the garage, and it is time to spray. I am using Krylon Low Odor Acrylic sprays.
 
 
It took many coats of spray to seal all the papers.

 
I signed and dated it on the back.
 
 
I love you Wednesday!


Wednesday, August 22, 2012

Baby Hearts quilt


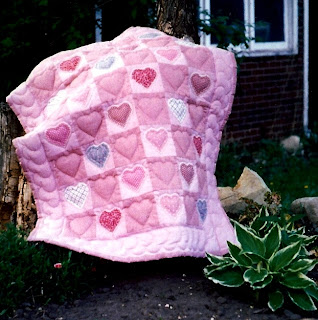
This is something from the past to share with everyone. I really wanted to make a quilt with appliquéd hearts and do some hand sewing. My oldest daughter was going to have surgery and have her tonsils removed. I cut out the hearts and the little squares and put together a sewing kit that I could have handy to work on while she recovered. I chose pinks and mauve tones and added a little bit of country blue which was a popular color at the time.


I hand quilted a heart inside of each of the appliqué hearts and also a quarter inch around the outside edge. For the border I laid a heart on its side and drew a row of hearts to fit inside the border area. The finished quilt is baby size.


Monday, August 20, 2012

Victorian Crazy Quilt – Summers, Flower Patch


I think the main reason Victorian crazy quilts are so interesting to me is that each block is totally different. The incredible variety of fabrics that would normally not be used in a traditional pieced quilt, and random sewing of these fabrics, makes a crazy quilt a marvel to look at.


n this photo you can see that the tiny flowers and leaves that I clustered together.  


I love the herringbone stitch, and here it is shown overlapping two rows using two colors of pearl cotton.


When I assembled the quilt blocks I used unbleached muslin as a base, and then used the sew and flip method to construct the squares.


In the lower left hand part of this photo I added beads that were clear, but had a yellow center. I was always on the lookout for something different to add.


Although a person could make a Crazy Quilt with a color theme (and I have done that in the past) on this project I used very brilliant colors and fabrics. I added a bit of black here and there for contrast.


When I was photographing my blocks I had a real hard time with the reds and pink fabrics. They wanted to appear too saturated in the pictures.

Sunday, August 12, 2012

Victorian Crazy Quilt, Garden block


For a while now I have been playing with the idea of creating my own fabric. With my husband encouraging me to do another Victorian block, I thought that this would be a nice time to experiment with that as well.


I started with a piece of white bridal organza and sprinkled on snippets of cut up rayon threads and pearl cotton. I scrunched some lime green tulle and placed it over the top. Then I used a piece of tear away stabilizer and drew a one inch grid on the diagonal. I pinned it in place over the tulle.


I then took it to the machine and sewed over all the diagonal lines I had drawn.


And then it was time to remove the stabilizer. It came off nice and clean without too much trouble.


With the stabilizer gone I had a nice piece of fabric to work with. I backed it with some cream colored felted wool, and   placed it on my cutting mat. With the help of rulers I positioned a beautiful lace around the outside to create a border on my quilt. Then I covered the entire piece with another layer of white bridal tulle that had a little sparkle. With all the layering in place, I stitched over the lace with white thread to hold it down where I wanted it to stay.


I wanted to do a little machine quilting, so I free hand stitched rows of feathers on some of the diagonal stitching lines with blue and lime green thread. This extra sewing helped to hold everything in place.


With the quilt trimmed to size, I stitched an eighth of an inch from the outside edge. You can see the white organza showing thru in places and also the various threads under the layers of tulle.


Once the fabric was stable, I was able turn my attention the hand embroidery work. Following the diagonal lines that I had sewn on the base fabric, I used various embroidery stitches and pearl cotton threads.


My approach to this project was a little different than a traditional Victorian block. Since I didn’t have the seam lines to follow, because the block was not a pieced block, I followed the diagonal lines I had stitched when I first made my fabric base.


Here you can see the layers of the different stitches I used.  


This is how the block looked when the stitching was finished.  Now it is time for the really fun part of this project.


I used hand quilting threads to sew the little beads in place. Since I didn’t have the backing fabric of the quilt in place yet, I didn’t have to worry about hiding any threads when I embroidered and then sewed the beads in place.  


I had some really tiny glass seed beads so I added a small cluster of grapes.


I love how this section came together. Upon searching in my bead collection, I found these glass heart beads with purple swirls. They were perfect for the center of the flowers.  


When I thought I had come to the end of beading and embellishing, it was time to take care of the edge of the block. I removed the machine stitching I had sewn on to hold the edge together with my rotary cutter and resized the quilt. I added another layer of felted wool and fused it in place from the back of the quilt with Misty Fuse. I then fused my backing fabric in place using the same procedure. The edge of the backing fabric was trimmed to one inch from the edge of the quilt.  


I then rolled the binding to the front and pinned it in place.


Now just a little hand sewing and the project is done.


Here is the finished block. There is so much to look at throughout the quilt. It is truly a feast for the eyes!