.JPG)
Well,
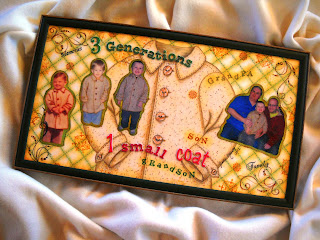
I finally have some time to share the process of making this collage for my
husband, Joe. When he was very small his mom dressed him in this little coat,
and took a picture. He received the coat from his mom, and when we had our son
Joseph, we too dressed him in the coat and took a picture. The little coat was
then given to our son, and when he had his little guy, Tommy, he also wore the
coat. This small coat has been around for fifty years now. We all refer to it
as the “oatmeal coat” because the fabric looks like oatmeal or malt-o-meal hot
cereal.
.JPG)
I wanted this project to be special
for Joe, so a lot of thought went into the planning. I started by drawing an
image of the coat on mat board. I was amazed at how easy it came together.
.JPG)
After the coat was drawn in pencil I
decided to draw a grid to fill in the background.
.JPG)
I added color to the coat by using
colored pencils and fine point markers.
.JPG)
Once the coat was colored in, I then
added lines with a marker over the grid lines I had penciled in. It needed more
color, so I shaded over the lines with colored pencil.
.JPG)
The
green shading I had done on the background looked too green, so I then went
over it with brown ink. This seemed to give it the added depth I wanted. When
doing collage work it is all about a layering process.
.JPG)
I had my photos that I copied onto matt
photo paper and printed them out. I cut the images out of the photographs, and
placed them where I thought they would look nice over the background.
.JPG)
The photos appeared very plain, so I
cut an outline a little larger than each photo out of cardstock, and once again
inked the edges first with green and then brown ink.
.JPG)
I like to work with chipboard letters
and I chose to use two different styles for this project. They came in off-white,
but I wanted them to stand out, so I added color to them. Since the story
behind this artwork is all about the coat, I decided to make those letters red.
.JPG)
Stamping always adds so much to a
background. I had these wonderful snowflakes and placed them at random
throughout the piece. I then sprayed the entire piece with acrylic spray to
coat the inks.
.JPG)
Once everything was glued in place, I
stamped in the words: Grandpa, Son, and Grandson and some pretty swirls with
some stamps I had on hand. I then coated the entire surface with paper glaze.
While it was still wet, I sprinkled some very fine sugar glitter over the
glaze.
.JPG)
When the paper glaze was totally
dried I added rhinestones to add a little sparkle.
.JPG)
I sprayed the entire surface many,
many times with acrylic sprays throughout the making of this piece. This gave
it more depth, and coated it very well, since I knew when it was placed in a
frame I would not be putting it behind glass.
.JPG)
Here is a close up of all three boys
wearing the coat. You can tell by the photos that different cameras were used,
and the quality of the photos changes at the years go by.
.JPG)
.JPG)
.JPG)
.JPG)
.JPG)
The
rhinestones I used were gold in color, and were a good accent with all the
brown inking and stamping I had done.
.JPG)
I
stamped the work “Family” in black ink. I thought that word was very fitting
with the theme of this piece.
.JPG)
I
also stamped these lovely swirls in black over all the layering of paper glaze
and acrylic spraying that I had done. They appear to be right on the surface where
I wanted them.
.JPG)
This “Memories” text was also added to go with the theme. I
wonder what Joe’s mom would think of the little coat project if she were here
to see it.

I just got it back
finished from the framing store, and I am very happy with how it turned out. I
chose a hunter green wooden frame with a little brown border around the outside
to blend with the brown tones I used throughout this artwork. It looks lovely
hanging in Joe’s office over his desk.
No comments:
Post a Comment